Friday, December 21, 2007

Lemon Delicious Pudding after our First Pork Crackling in 10 Months

We had Alex over this evening for a delightful pre-Christmas meal. For those of you who don't know, Alex is another Postdoc at Purdue with whom I share an office. Anyway, the meal itself revolved around two things, our first pork crackling in 10 months, and a scrumptious lemon delicious pudding. Pork crackling is the skin of a piece of roast pork that is scored, salted and then goes really crispy. Unfortunately there were no pictures as it disappeared too soon, as it is one of Gemma's favourite foods. Along with the roast pork and crackling, we had roast potatoes, braised red cabbage, steamed broccoli, apple sauce and gravy made from the roast drippings.

For dessert I needed to try a recipe I have for lemon delicious pudding, which is basically a pudding that is lemon sponge cake on top and a thick lemon sauce underneath (it naturally settles that way during the cooking). The recipe itself comes from arguably one of the most useful cook books ever, Stephanie Alexander's "The Cook's Companion". The recipe turned out great, really lemony which was great after the pork.

The pudding once it's out of the oven and GBD (golden brown and delicious)!


A view inside, showing the sponge on the top and the sauce down the bottom.


From Stephanie Alexander's "The Cook's Companion":

Lemon Delicious Pudding

Ingredients
2 lemons
60g butter (4 tbsp)
1 1/2 cups sugar
3 eggs, separated
3 tbsp self-raising flour (or 3 tbsp flour and a pinch of baking powder)
1 1/2 cups milk

Method
1. Preheat oven to 180C (350F) and butter a 1L (1 Quart) ovenproof basin or serving dish, OR butter 4 10oz ramekins.
2. Zest 1 lemon and juice both. In a food processor, cream butter with zest and sugar, then add egg yolks.
3. Add flour and milk alternately to make a smooth batter. Scrape mixture from sides of processor bowl and blend in lemon juice. Transfer to a bowl.
4. Wisk egg whites until creamy and firm and fold gently into batter. Pour batter into prepared basin. Stand basin in a baking dish and pour in hot water to come halfway up sides of basin. Bake for 1 hour. Allow to cool a little before serving.

Thursday, December 20, 2007

A look back to Thanksgiving to look forward to Christmas - The Turkey


I may have been lax so far in updating this blog, I thought that I would finally post about the turkey we did for Thanksgiving. We managed to wrangle a free range organic bird weighing 11 pounds from the local health food shop (rather than the local megamart).

There were six basic steps that I go through to prepare a turkey over two days:
1. Brine the turkey (two days out)
2. Dry the turkey (afternoon before)
3. Prepare the turkey for the oven (morning)
4. Cook the turkey low and slow, then
5. Glaze and brown the turkey high and fast
6. Rest the bird, carve then eat!

So we begin with step 1: the brine. Brining the turkey does a few things. It makes the bird plump and juicy, as well as seasoning the bird and introducing other flavours into the meat. The basic recipe for the brine is 3/4 cup of salt and 3/4 cup brown sugar to 1 gallon (4 Litres) of water. I ended up doubling this recipe for the turkey in order to fit it fully submerged in the bringing container.

To this you can add any number of flavours that will complement the final flavour profile you want. For this turkey, I went with bay leaves (3), black pepper corns (1 tbsp), cinnamon sticks (2) and juniper berries (1 tbsp). Simply place the sugar, salt and seasonings in a saucepan and add about 2 cups of the water. Bring to a simmer then simmer for about 10 mins. Allow to cool thoroughly then refrigerate along with the rest of the water you will use. Once cool, add the mix to the container then place in the bird, washed, which should be fully submerged in the brine. Leave it in a cool place for at least 8 hours or preferably overnight.

The turkey ready to be washed.

The turkey in the brine. Yes I used a cooler (an esky for those in OZ) as the container, as it keeps the bird cool. You can also add ice to the mix to keep the temperature down.

Step 2: Dry the bird. In order to get a nice skin formed, it's important that the bird is dried thoroughly. To do this, I remove the bird from the brine, rinse well then dry with kitchen paper (or an old kitchen towel). Place on the rack you will eventually cook it in, place it over a tray and stash in the refrigerator overnight.

Step 3: Prepare the turkey for the oven. The first step to this is to remove the bird from the refrigerator at least an hour before cooking to allow it to come to room temperature. As the first cooking is done at a low temperature, this step will greatly reduce the overall cooking time.

To prepare the turkey, we have to consider two things, the cavity and the roasting tray under the bird. Firstly, I never stuff the turkey with stuffing. The basic idea is that by the time the middle of the stuffing has reached the safe temperature for killing bacteria, the meat itself, especially the breasts will be overcooked and dry. However I do stuff the cavity with lots of aromatics. In this case, I used 1 lemon, 1 orange, 1/2 onion and a bunch of sage. Simply quarter everything and stuff it in the cavity. There is no need to season the cavity however as the brine has done that job for you.

In the roasting pan underneath the turkey, I place lots of vegetables to get a head start on the gravy. I used 3 carrots, 2 onions, 6 stalks celery and 2 heads garlic (yes whole heads). Simply chop roughly, and slice the heads of garlic in half. Place these in the bottom of the roasting tray before putting the turkey in it's rack on top. If you don't have a rack, just build a small mound from the vegetables and put the turkey straight on that. Finally give the skin of the turkey a good rub down with oil and it's ready for the oven.

Rubbing down the prepared turkey.


Step 4: Cook the turkey low and slow. One of the secrets to cooking such a large piece of meat is to actually cook it low and slow to start. This will bring the inside temperature of the meat up without overcooking the outside. So preheat the oven to 250F (120C) for about half an hour before placing the bird in the oven.

If you have a thermometer designed to go in the oven (the best way of ensuring a well cooked turkey) place it in the bird now. On the day I was about to use my probe thermometer, which consists of a thermocouple probe that stays in the turkey, connected to a temperature gauge outside the oven. Unfortunately the probe wire somehow burned out on the morning after about half an hour in the oven, so we quickly changed tac, went low tech, and stuck Robin's roasting thermometer in instead (the one you can see in the top pick). A final note, once you stick the thermometer in, it stays there until carving. Otherwise you end up with a gaping wound for any juice to pour out. That goes for the annoying little pop timer that most turkeys come with; leave it in but rely on your thermometer.

Once the bird is in the oven, you want to cook the bird until it registers an internal temperature of 155F (68C). While the safe temperature for turkey is 165F (74C), the turkey will continue cooking from both the hot blast once the glaze is on, as well as carryover. For those of you who don't know, carryover is the process where by the meat continues to cook even though you have removed it from the oven. Basically if it's done once it's removed, then it's overdone by the time it's rested. If you look closely at the picture at the top of the post, the final temperature of my glazed bird was just below 160F.

Step 5. Glaze and brown the turkey high and fast. Once the turkey has reached an internal temperature of 155F, remove the bird and raise the temperature of the oven to 450F (230C). Glaze the turkey with the prepared glaze then once the oven has reached the required temperature, place the bird back in for 5 mins. Remove, glaze again and cook for a further 5 mins. Finally remove the bird, give it a final glaze.

While you can use what ever you like in your glaze to match the flavour profile you are shooting for, I went with an orange, ginger and sage glaze. Simply reduce 1 1/2 cups orange juice with 2 tbsp brown sugar, 1 tbsp grated ginger and a few shredded sage leaves until syrupy.

6. Rest the bird, carve then eat! Resting is without a doubt one of the most important steps in roasting any meat, especially large pieces like turkey. A good rule of thumb is for a turkey this large to rest for about half an hour, any bigger and I would even go up to 45 mins. Once the final glaze has been applied, wrap the turkey well in aluminium foil and leave to rest UPSIDE DOWN. That's right, a little trick I picked up from Maggie Beer. Doing this will allow any juices to naturally make their way to the (usually dryer) breast meat, making it juicier.

The bird out of the oven and glazed.


Once rested, its then carved. My technique involves removing the whole breasts then slicing them separately. Remove the legs and thighs as one piece, then chop the leg off and if you want to be really fancy, bone the thigh and slice. In this way you guests will be able to get a bit of the white meat and a bit of the (more tastier) dark meat.


Finally, the gravy. While not essential for everyone, there is so much flavour going to waste in the bottom of the roasting tray it would be a shame not to turn it into a nice gravy. Once the bird is resting, place the roasting tray over heat (I was in Robin's kitchen so I had gas which was great). Add a little turkey stock to the tray and start scraping all the burnt looking bits from the pan with a wooden spoon (the French call those bits in the bottom of a roasting pan the fond, which is the foundation to all good meat sauces). Once most of the bits are dissolved into the stock, add some more stock (about 1 1/2 cups in all) and bring to a simmer, squishing the vegetables in the bottom of the pan to extract as much flavour as you can.

Once the mix has simmered for about 5mins, strain through a strainer, again pressing on all the vegetables to extract as much liquid as possible. Allow the liquid to settle to see how much fat comes to the surface. Pour this fat off into a saucepan and add enough butter for there to be about 2 tbsp of fat in all. Add 2 tbsp flour and cook for a few minutes. Add the liquid, a little at a time at first, stirring all the while, until all is added. Simmer this until thickened. This is your basic gravy (or more correctly a veloute) which you can either serve as is (once you have tasted for seasoning) or jazz it up. In my case, I added a tablespoon of pomegranate glaze, a tablespoon of cream and a tablespoon of butter to give it a further richness. Finally, taste for seasoning to see if it needs more salt. Serve with the sliced turkey and enjoy!

Thursday, November 29, 2007

A Belated Thanksgiving Post

Well I can't say that I haven't have time, and I can't say that I have nothing to say. All I can say is that I am finally around to uploading some details of the large thanksgiving meal we had last week. I think possibly it was the size of the task at hand, with three starters, fourteen different main dishes and three desserts. Even so, there was not a lot of preparitory work to do in the days leading up to thanksgiving, mainly making both turkey and vegetable stock.

So, to start we had a duo of soups: a butternut squash soup with sage, and a cream of asparagus soup with fresh thyme. We served these with delicious little cheese biscuits Robin made, and a selection of local Indiana cheeses we bought from the local cheese shop on Main street (yes Main Street is the main street through Lafayette). We also enjoyed a rather nice mulled cider while people were milling around (for those outside the US, cider refers usually to unfilted apple juice, where as hard cider is alcoholic).

The main meal was made up of the following dishes:

Roast organic turkey with an orange, ginger & sage glaze
Vegeloaf with roasted red pepper sauce
Cranberry apple and maple sauce
Pomegranate gravy
Country bread, italian sausage and sage dressing
Potato, spinach and gruyere gratin
Stuffed sweet potatoes with pecan and marshmallow streusel
Green beans with olives, lemon and toasted almonds
Brussel sprouts in brown butter with pancetta
Honey glazed radishes
Maple roasted parsnips
Baked carrots with cumin & thyme
Skillet cornbread with pancetta and poblanos
Honey saffron loaf

Dessert involved two dishes of my own making and one of Noami's creations from Mexico:
Pumpkin custard profiteroles with glazed maple pecans
Angel food cake with and orange and orange blossom water syrup
Pineapple upside-down cake (volteado de piƱa)

I will slowly post them over the following days along with pictures, but to get us started, the starters!

Butternut squash soup with sage

1 butternut squash, cubed
2 tbsp butter
1 white onion, chopped
1 stalk sage, leaves removed and chopped, stalk retained
1 cup vegetable stock (home made preferably)
1 cup whole milk
Salt and pepper to taste

Simply steam the cubes of squash until very tender. Mash with a fork and place in a sieve over a bowl and leave for about an hour. Sweat the onion in the butter with a pinch of salt and the sage stalk (not the leaves) until softened. Add the squash and stock and simmer for 10 mins. Add the milk, simmer for a further 2 mins then process in either a blender or food processor. Put back into a saucepan and add sliced sage, and salt and pepper to taste. Keep warm until ready to serve.

Cream of asparagus soup

Bunch of asparagus, wshed and chopped into inch pieces
2 tbsp butter
1 onion, diced
1 cup vegetable stock (preferably home made)
3 springs thyme
1/2 cup cream
Salt and pepper to taste

Sweat the onion in the butter with a pinch of salt until softened (3 mins). Add the asparagus and cook for a further 2 mins. Add the vegetable stock and two stalks of thyme and simmer until the asparagus is tender. Process in a blender or food processor (removing the stalks of thyme) and place back in the saucepan. Add the cream, the leaves from the final stalk of sage and salt and pepper to taste. Keep warm until ready to serve.

Monday, November 19, 2007

A Mid-week feast - Enjoying a fine glass of Beaujolais Nouveau

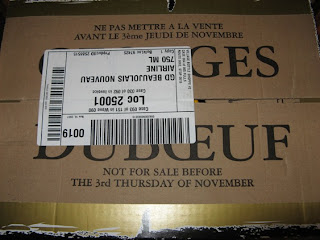
In preparation for our thanksgiving feast this Thursday we needed wine (of course) so we went to the local bottle shop, which is the only good wine shop in town. We entered the store and were confronted by this delightful sight...

Beaujolais Nouveau is the first French wine of the season and historically a cause for celebration (just like most things that happen in France). It can only be open and sold after the 3rd Thursday of November, as the top of the box suggests.

The wine itself is a light red, closer to a rose than a traditional red. It was exactly what I was after to drink with the thanksgiving menu I have been planning. However I couldn't stop at the four bottles we wanted so I had to get one of the five cases in the Lafayette area. We have had the wine before, as a great celebration meal at Le Classic, our old local French restaurant with food and wine parings centered around the Beaujolais Nouveau. Anyway we couldn't wait to try this seasons bottle, so we went home and popped the cork.

The wine was beautiful, very light for a red. This is best displayed by the fact that Gemma loves it (she doesn't usually like any reds). While light in body, it makes up for it with a large fruity aroma smelling of blackberries and raspberries. Generally a great drop to have on a hot day with a light meal. OR on a really cold night (it's supposed to snow here either tonight or tomorrow night).

In order to fully appreciate the subtleties of the wine, as well as cure a hunger we had, i knocked up a quick cheesy pasta with prosciutto. It was simple and quick (fulfilling my needs) and cheesy and prosciuttoy (fulfilling Gemma's needs).

Anyway here is the recipe:

Cheesy pasta with prosciutto

2-3 slices prosciutto, sliced thin
1/2 red onion, sliced fine
1 tbsp olive oil
2 cloves garlic, chopped
2 tbsp butter
2 tbsp flour
1 tbsp parsley, chopped
small handful baby spinach, chopped
1/2 cup whole milk
1/3 cup cheddar cheese
2 tbsp goats cheese
1 cup uncooked pasta
salt
4 tbsp Parmesan cheese, grated

Bring a large pot of salted water to a boil. Add the pasta and cook until al dente (with a slight bite left). Saute the prosciutto and onion in the olive oil (no need to add salt, as there should be enough from the prosciutto). After a few minutes add the garlic and butter. Saute until melted and the garlic is fragrant. Add the flour stirring well. Cook for a few minutes stirring often. Add the milk a little at a time (there is no need to warm the milk before hand so long as you add it in installments and stir well to combine between). Allow to simmer for a few minutes, then add the cheeses. Stir to melt and season to taste with salt and pepper. Add the pasta when cooked and stir to combine. Separate into bowls and grate Parmesan cheese over the top.

Cooking for Thanksgiving - Veggieloaf

For those of you who don't know, thanksgiving is coming up in the US, Thursday to be exact. It's basically an excuse to get a few days off work, travel halfway across the country (if you are so inclined) to be with family and eat mountains of food while either a) watching American football, b) drinking with family, c) remembering that while you love your family, it's great you only have to see them once a year, or d) all of the above. While I must admit this is not my experience, I have been told by others that this is the case.

Anyway, we have actually been celebrating thanksgiving in Australia since 2004 when we hosted John from Seattle. This will be however our first thanksgiving in both America and in the cold (it's almost snowing). We decided that as we would be celebrating thanksgiving in West Lafayette, we would gather together those others that did not want to travel but wanted good food and company.

So we have thirteen people getting together this Thursday at Robin's place (again :)) Group consensus was that I would look after the menu and the planning (and pre-cooking), everyone would help cook on the day, everyone would put in $20, with any money left over to be donated to a local charity in keeping with the thanksgiving spirit. Over the next few days I will relay the dishes we end up cooking, but I thought that I would start with a veggieloaf. I had a few requests for a vegetarian main dish to go along with the turkey, that 'could be smothered in cranberry jelly'. So after consulting many recipes, I took my inspiration from a vegetable loaf with lentils, falafel, the chickpea and spiced patty, and Alton Brown's technique for meatloaf.

It sure looks good out of the oven and before the final glaze of the roasted red pepper sauce (see below) and I will let you know how it tastes come Thursday!
Veggieloaf with Roasted Red Pepper Sauce

For the Roasted Red Pepper Sauce:
4 red peppers, roasted & diced
1/2 cup canned diced tomatoes, drained
4 cloves garlic
6 oz. silken tofu (170g)
2 tsp red wine vinegar
dash hot sauce
1/4 tsp. kosher salt
1/4 tsp. freshly ground black pepper

For the Lentil Loaf:
1 cup orange lentils
1 can chickpeas, drained
1 can black beans, drained
1 ½ cup vegetable broth
1 yellow onion, diced fine
1/2 red onion, diced fine
2 large stalks of celery, diced fine
3 large carrots, grated finely
2 cloves garlic, minced
4 oz. mushrooms, diced (110g)
2 large eggs, lightly beaten
2 tbsp chopped fresh parsley
1/2 tsp kosher salt
1/2 tsp. freshly ground black pepper
1 tbsp. dark soy sauce
1 tsp. dried oregano leaves
1 tsp. dried thyme leaves
2 tsp coriander seeds, ground
2 tsp cumin seeds, ground
1/2 tsp cinnamon, ground
2 cloves, ground
dash hot sauce
1/2 cup breadcrumbs
1 tsp. butter

1. Preheat the oven to 350F (180C). Spray a loaf pan with nonstick cooking spray.
2. Make the roasted red pepper sauce first by combining all the ingredients for the sauce in a blender or food processor and pureeing until smooth. Set aside.
3. Add lentils, chickpeas, black beans and broth to a saucepan and cook for 15 mins uncovered until the lentils have dissolved, the chickpeas are soft and most of the liquid evaporated. Start to mush most of the chickpeas and beans to thicken mixture. Allow to cool.
4. Saute the diced onions and celery until slightly browned. Add grated carrot and cook until most of the liquid has evaporated. Add the mushrooms and repeat. Finally add the garlic and cook for a further 2 mins. Transfer to a bowl and allow to cool.
5. Fold in 1/4 of the roasted red pepper sauce, the herbs, spices, salt, pepper and whisked eggs. Fold in the bean mix, then add the breadcrumbs. Transfer to the prepared loaf pan and dot with butter.
Bake for 45 minutes or until the loaf is firm and cooked through. Allow the loaf to cool for at least 5 minutes before turning out onto a tray lined with foil. Baste with another 1/4 of the roasted red pepper sauce and place back in the oven for 10 mins to form a crust. If eating straight away, allow to cool for a few minutes then slice, serving with the remaining roasted red pepper sauce on the side. Or wrap well in Aluminium foil and keep refrigerated. To reheat, place in a 350F (180C) oven for about 15 mins or until warmed through.

Wednesday, November 14, 2007

Breaking in Alice & Steve's new stove

What occasion could be better for the posting of my first recipes than the breaking in of a new stove? Alice and Steve have just bought a new house and had to replace the gas stove as it stopped working. So when Alice offered me the opportunity for really giving it a workout, I jumped at the chance. Not only was it a good excuse to cook something purely from the ingredients in her pantry and fridge, but it was gas, something I have been missing cooking with.

Alice's only constraint to the food that we cook was that it contain lots of vegetables, not a hard thing since Alice's fridge was full of great veggies. I also wanted to use something that I had never cooked before, Quinoa. We started by roasting lots of vegetables, including sweet potato, carrot, acorn squash and garlic, cut into half inch pieces and tossed in herbed olive oil. For the Quinoa, we were advised to treat it like cous cous, something that I do cook often. We cooked the Quinoa in half vegetable stock, half water, with a little white wine added for flavour. We then sauteed some onions, kale, oyster mushrooms and garlic, and tossed these with some toasted pine nuts, mint and the juice and zest of a lemon. This was added to the cooked Quinoa and seasoned well. The final touch was some toasted sourdough, rubbed with more garlic (there seemed to be a lot of garlic everywhere this time), smooshed with goats cheese and broiled until slightly browned.


As no good meal is complete without something sweet to end, I knocked up a banana and crystallized ginger, blueberry muffin & butter pudding. After sauteing some chopped banana and crystallized ginger in a little butter and placing it in a heatproof bowl, I topped it with slices of blueberry muffin that had been soaked in an egg custard. Finally, i sprinkled the top with raw sugar and baked for about twenty minutes.


So, the specific recipes:

Warm Quinoa Salad with Roast Vegetables and Goats Cheese Crostini

Serves 4

For the Warm Quinoa Salad
1 cup Quinoa, rinsed
1 cup vegetable stock
1 cup water
2 tbsp white wine (optional)
1/2 tsp pinch salt
1 cup hot tea
6 dried apricots, sliced thin
1 tbsp butter
1 small onion, diced
4 leaves kale, shredded
2 cloves garlic, minced
6 large oyster mushrooms, sliced
1 small tomato, diced
1/3 cup toasted pine nuts
8 leaves mint, chopped
1 lemon, juice and grated zest


Bring the stock, water, wine (if using) and salt to a boil. Add Quinoa, stir and reduce to a simmer. Cook until done and the liquid absorbed (about 15 mins but keep testing for doneness). Meanwhile rehydrate the dried apricot in the tea until plump, then use the tea for the next recipe. Saute the onion and kale in butter over medium heat. After slightly browned, add garlic and oyster mushrooms and saute for a few minutes. Add the chopped tomato, cook for a further minute and remove from heat. Add the pine nuts, mint and lemon juice and zest. When the Quinoa is cooked, stir in the vegetable mix.

For the roasted vegetables
4 tbsp olive oil
1 tbsp balsamic vinegar
1 tsp dried oregano
1 tsp dried thyme
1/2 tsp salt
1 large sweet potato, 1/2 inch cubes
2 carrots, 1/2 inch lengths
8 cloves garlic
1 acorn squash, chopped into inch chunks with skin on

Mix the oil, vinegar, herbs and salt together in a large bowl. Toss the vegetables in the mix and arrange on a baking tray. Bake at 400F (210C) for about 30 mins or until tender.

For the goats cheese crostini
4 slices sourdough, sliced into thirds
1 clove garlic
4 oz goats cheese (100g)

Toast the sourdough slices under a broiler. Rub with garlic and smoosh with goats cheese. Broil for about a minute or until the cheese is slightly browned.


Banana and Crystallized Ginger, Blueberry Muffin & Butter Pudding

1 cup hot tea
1/4 cup raisins
1 tbsp butter
1 banana, sliced
2 tsp crystallized ginger, chopped fine.
2 tbsp conserve or marmalade (I used lime pear conserve)
1 blueberry muffin (or any other type of muffin), sliced
1 egg
100mL cream (3 oz)
2 tbsp raw sugar (or brown sugar)

Rehydrate the raisins in the hot tea until plump; discard tea. Saute the banana and ginger in the butter over medium heat for 1 minute or so. Add the conserve and cook for a further 30 seconds. Place in the bottom of a heatproof bowl with the raisins. In another bowl, whisk the egg and cream together. Submerge the slices of muffin in the custard mix then arrange on top of the banana. Pour any remaining custard mix over muffin slices, then sprinkle top with raw sugar. Bake at 350F (180C) for about 20 mins.

Sunday, November 11, 2007

Finally my first post...

Well, this is it. My first post in my own food blog. I set up the site about a week ago, and while there have been many thoughts and cooking exploits between now and then, I haven't got around to write until now.
As the blurb suggests, I am starting a food blog mainly to talk about food and cooking. Sure it will be a showcase of my adventures with food, both triumphs and failures, but I will also discuss something that has become very important to me, where food comes from.
To give an overview of who I am for the purposes of this blog, I am a 27 years old and currently reside in the middle of corn and soy fields in Indiana, USA. I am Australian however, and moving back there in a few months.
I have only been cooking since I left home and moved in with Gemma. Since then, I have both taught myself to cook, and discovered that it is a real passion. A place where both my analytical scientific mind and my creative flair can finally play nice :)
I am however also an engineer, or to be more precise an engineering educator. I have a bachelor in both engineering and science, and a PhD in engineering education. I am currently a postdoctoral researcher and will be taking up a position as a lecturer in engineering in April back in Australia.
This bog is an attempt at capturing my cooking exploits, both small (what's for dinner) and large. Those that know me know that I have a reputation for wanting to hold rather large parties where food features predominently. For example:

The whole pig we spitroasted for our going away party in Australia.


And the whole lamb we butchered (broke down) ourselves for the Aussie party we had in September.
I have also made my own bacon (pancetta actually), corned beef and mustard pickles to name a few things.
Anyway, I look forward to starting a conversation with you, and I do encourage you to write comments, make suggestions and offer your own views.
Cheers!